PURPOSE
After my experience with purchasing and using a QNAP NAS (a TS-559 Pro+ bought in 2010), I wanted to build my own using Arch Linux. The QNAP taught me a few things, such as experience using RAID (I used five disks in a RAID6 configuration), rotating backups with the now-defunct rsnapshot, and upgrading the disks' firmware (the disks I had used had a firmware bug, that was patched). From the very beginning, when I bought the original QNAP setup, I hated the QNAP OS web GUI, which was a web front end to everything in the QNAP. I mostly managed it on the backend using SSH, but even though the QNAP used Linux, it wasn't set up in a Linux Standard Base fashion, and I never quite understood how it set up the mdadm RAID array. I had shoehorned rsnapshot (based on rsync) into it, but restores ultimately became a nightmare. Not only that, the QNAP device itself became increasingly vulnerable to many disparate security vulnerabilities, and by the end of it I was worried the QNAP OS would no longer be maintained for my aged NAS. I ultimately replaced the OS with Arch, and now it's sitting in standby mode, awaiting a test of a restore from my Borg Backup storage on the Backblaze B2 cloud (an integration I've set up myself).
I decided to build a new file server, which I'm using as a DIY Network Attached Storage (NAS) device, but I control everything on it completely. This also means I have to keep it up to date on my own. I use the pikaur AUR helper to install official repository packages as well as AUR packages, and I have an upgrade shell function which uses pikaur and then lets me know if I have to reboot or restart any services (it also relies on needrestart for this purpose).
I've settled on a hostname scheme for my local network, naming hosts after elements on the periodic table of elements. My old QNAP NAS originally had the hostname nasty, but I figured that was a bit too pedestrian once I picked up the elemental naming scheme. In light of this, I renamed nasty to sodium (chemical symbol Na), and gave it the IPv4 host address of 11 (the atomic number of sodium). My new file server I dubbed tennessine, since I purchased it shortly after my move to Tennessee, and it has the IPv4 host address of 117 (the atomic number of tennessine, likely a halogen). I will refer to the new file server as tennessine going forward throughout these articles.
This is the first in a series of articles where I describe the setup of tennessine.
PREREQUISITES
- A server-class system with an x86_64/amd64 compatible CPU (Arch Linux only supports this CPU architecture, anything else is a spinoff or derivative distribution), and plenty of hard drive bays. I chose a refurbished Dell PowerEdge R730xd, with eight 3.5" drive bays. While this server came with its own hardware RAID controller (a PERC H730), I did not intend to use its hardware RAID functionality. It also comes with a number of Intel Gigabit Ethernet devices, though only one is required (you may want more than one if you've segregated your local network using VLANs, or intend to use Ethernet bonding to increase througput). Also, you'll want as much system memory (RAM) as you can afford. This R730 came with 16G of RAM, which has turned out to be plenty.
- The largest capacity hard drives that you can afford. Ideally you'd have every HDD slot of your server filled with a hard drive. At the time I purchased my R730, 14T SATA3 (6G/s) were at the sweet spot in terms of most bang for your buck (I purchased these components in early 2021). I also installed an NVMe SSD as a boot/root device, but unfortunately this UEFI system can't directly boot off of it. Perhaps a firmware update will correct that, I'll have to see. I did partition each disk, with a small slice/partition on each for an EFI partition, with the rest of the disk used as block devices for a Btrfs multi-disk setup.
- Arch Linux installation ISO, copied to appropriate boot medium (USB flash disk, DVD-ROM, PXE, etc.). I have an old 1G Memorex USB flash disk I use for this purpose, it's over a decade old and seems to still be functional.
DESIGN
My intention was to install Arch Linux as the OS for tennessine. I track the standard linux kernel package, so I'd always run the latest, stable production kernel (tracking pretty close to the upstream kernel.org version). The main reason for this is I intended to use Btrfs for the hard drive array.
An alternative would be ZFS, but since it's not distributed using a GPL-compatible license (ZFS uses the CDDL), it seems to me that keeping it up to date would be more difficult system administration wise than Btrfs, especially given that Arch updates the linux package quite frequently. Because Btrfs (as of this writing) still has some unresolved issues with parity RAID levels (RAID5/RAID6 is unstable), I've chosen to set up multi-disk mode in RAID10 for both data and metadata. This way I can lose more than one disk at a time (as long as no more than one disk in a RAID1 nested mirror pair fails at the same time). I have six disks dedicated for data, with two as hot spares (though removing a failed/failing disk from the Btrfs volumes and adding the replacement is not automatic at this point). For tennessine, with six disks plus two hot spares (14T disks), I get 39T of usable space from the array. If I were to include the hot spares in the Btrfs file system, I'd have more than 50T space available. However, I'm a little paranoid about disk failures, and I want to be able to replace a drive quickly should one fail. These Seagate drives came with a five-year warranty, so hopefully I can get any failures replaced without much extra cost.
The main reason for using Btrfs (or ZFS) is to have filesystem level snapshots (using snapper), for backup purposes. You could also instead use the Logical Volume Manager (LVM) with Thin Provisioning, if you wanted to stick with older filesystems like ext4. The snapshots themselves are not backups, but I create a snapshot, mount the latest snapshot read-only, and sync the mounted Borg Backup data directory snapshot to Backblaze B2. This ensures Borg clients do not write to the subvolume during the backup to the cloud, without interfering with the clients' ability to back up to the main Borg repositories on tennessine. More on this in the Btrfs, Borg, and Backblaze B2 articles in this series.
I have set up SMART to constantly monitor these disks, and should get notified (by email and SMS text message) should one transition into pre-failure mode. More on this on the S.M.A.R.T. article in this series.
As I was writing this series of articles, I realized that my initial Borg setup did not encrypt data from the clients to tennessine. More on this in the Borg article. One design decision for Borg is which user on the client actually initializes and creates the archives through Borg. As I see it, there are three options: 1) have root (the super-user, or admin user) initialize the Borg repositories, and create the archives, maintaining the ability to read all system and user files; 2) have a non-root user do this for all backed up files on the system; or 3) have each user individually back up their own files. Option 1 is the simplest, and what I had set up previously. I did try option 2, but there are several files which only the owner should be able to read (namely OpenSSH private keys, and certain cached files). I even tried setting this non-root user read access through POSIX Access Control Lists (ACLs), but I could not completely eliminate the permission denied errors in my Borg journal on the clients, and the ACLs would be extra metadata that I didn't really want to restore. Option 3 is more work, and to back up system files you'll need root to do it as well (same problem as option 2 otherwise).
The backup model I plan to use is to have two copies on my local home network: the original client system, and the Borg backup files on tennessine, in addition to off-site backups. If I'm ever making major changes to my personal systems (such as reinstalling the OS), I make specific backups to tennessine before continuing, which doesn't currently involve Borg. Now that my file server setup is relatively complete, I may not need to make discrete, non-Borg backups before a major OS reinstallation (or any other heavy maintenance). We'll see when the time comes.
For off site backups I have two off-site locations. One is private Git repositories on my SSDNodes Virtual Private Server (VPS), running Arch Linux (see my article on how I achieved this, as Arch is not a supported OS for the SSDNode) and Gitea (incidentally this VPS also runs this blog). This is mainly for my home directories and dot files on all my Arch Linux systems, and doesn't directly involve tennessine (other than the VPS is a Borg client for the Borg server on tennessine). The main off-site location is a Backblaze B2 bucket, set to only keep the latest version of files, and also set to delete files (should a Borg data directory on tennessine ever be empty or deleted, due to pruning and compacting, it will also be empty or removed in the B2 bucket). You could go with Amazon Web Services (S3), Google Cloud Platform, or whatever Azure offers for their cloud storage, or any other cloud storage provider. I chose Backblaze because at one point (before I started pruning and compacting my Borg repositories on tennessine) I had over 4T stored at a rough monthly cost of $20. During my first Disaster Recovery Exercise (DRE), I restored about 608GiB at 25MiB/s in about twelve hours, at a rough cost of $6.50. Your mileage may vary, but this seems quite affordable to me.
Below is a basic diagram of my various backup connections.
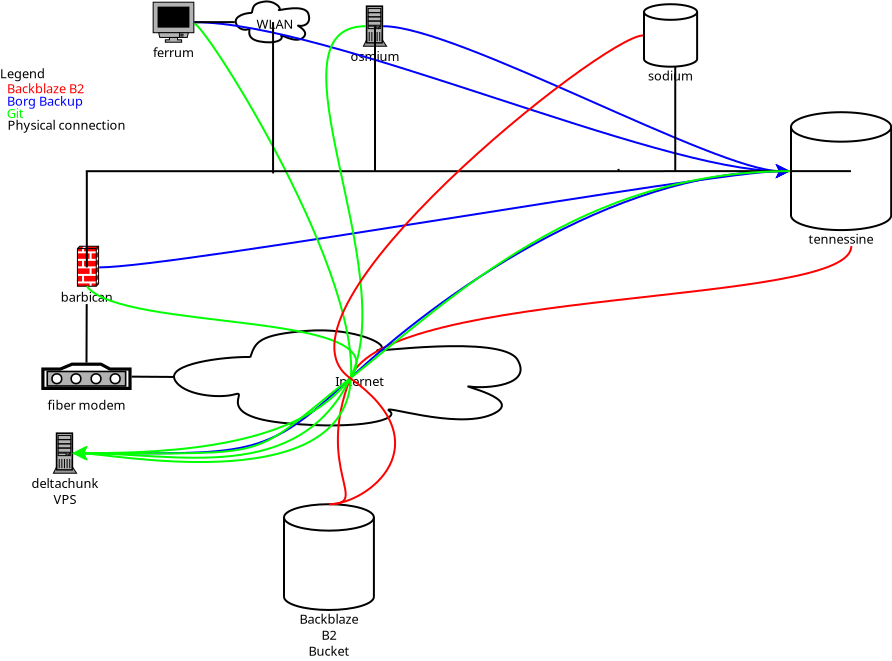
The red connections are my logical Backblaze connections, between tennessine and sodium (my old QNAP NAS, for restoration only). The blue connections are the logical Borg Backup connections, to tennessine. The green connections are logical Git, to deltachunk (my SSDNodes VPS). The black lines are physical (fiber/Ethernet/WiFi) connections on my home network.
NEXT STEPS
The following articles describe how I achieved the design listed above:
Please leave feedback below if you have any comments or questions!